In my last post I lied that regarding the QMovie player “I’m done here”. OK, to my defense, even I didn’t know that I’m not done yet. So today I present to you QMovie v2.0:
The details and downloads are on a dedicated QMovie page.
In my last post I lied that regarding the QMovie player “I’m done here”. OK, to my defense, even I didn’t know that I’m not done yet. So today I present to you QMovie v2.0:
The details and downloads are on a dedicated QMovie page.
This has been superseded by QMovie v2
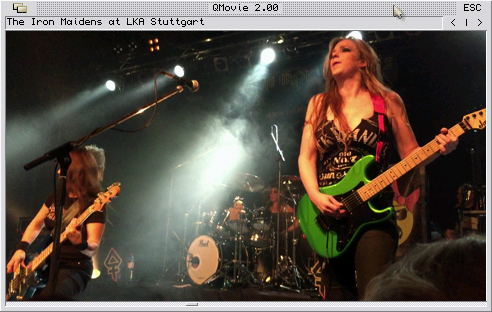
QMovie is a quick&dirty full colour movie player including sound for QPC. I really didn’t have the time to write this, but sometimes an idea latches itself into my head and I can’t let go until I have done something about it. So the target for this was “be done quickly” and not “be done perfectly”.
You can download it here (135MB). Just start the QPC2.exe and it should run. The movie frames are time synchronised to the audio. No double buffering (neither for the screen nor for the play buffer) nor any other fancy stuff is performed as the performance was already good enough.
Clip: The Iron Maidens recorded at the LKA Stuttgart by me. 10 fps, 20kHz mono
Creation of this video:
ffmpeg -i “IMG_7696.MOV” -r 10 -s 480×270 Frame_%04d.png
ffmpeg -i “IMG_7696.MOV” -f u8 -ar 20k -ac 1 sound.raw
Convert all Frame_%04d.png into _spr files using PNGConv. Settings: “binary”, “.” separator, “solid mask”, “no compression”.
The resulting Frame_xxx.spr and sound.raw files are combined using a quick Perl script called qmovie-concat.pl.
The QMV Format is an interleaved data format with one second of audio, followed by one second (10 frames) of video in Sprite format (fixed size, must not be RLE compressed). No meta data is saved (remember, “quick” was the motto here), all things like resolution and frame rate are hard coded into the qmovie_exe file.
Feel free to improve it, I’m done here 😉
A colleague of mine needed help wrapping some C DLLs for NodeJS. He’s using the Node FFI API for the wrapping, which unfortunately is a little light on documentation. The problem was that by default Node FFI wraps cdecl functions and there is no mention of stdcall anywhere. In fact the consensus on the net seems to be that it’s not possible at all. Reading the sources proved more fruitful and so I document the way here for future generations to find:
The standard way of initializing a FFI wrapper using the array in the constructor
var libm = ffi.Library('libm', {actually takes an additional parameter with the calling convention, but in stdcall the function names are often decorated with an additional “@x” which denotes the bytes the function parameters need on the stack. Problem is, blah@x is not a valid identifier and in the array the Javascript function pointer always has the same name as the function in the DLL. The solution is to manually wrap the functions, which I actually prefer anyway as the function pointer doesn’t end in a struct but can be used directly afterwards:
'ceil': [ 'double', [ 'double' ] ]
});
var TcAdsdll = new ffi.DynamicLibrary('TcAdsDll', ffi.RTLD_NOW)

var AdsPortOpen = ffi.ForeignFunction(TcAdsdll.get('_AdsPortOpen@0'), 'long', [], ffi.FFI_STDCALL)
The resulting wrapper is called using “AdsPortOpen()” and it accesses the function with the decorated name “_AdsPortOpen@0”. The easiest way to get the decorated name is using the dumpbin utility from Visual Studio with the “/exports” parameter:
C:\Windows\System32>dumpbin /exports gdi32.dll
Microsoft (R) COFF/PE Dumper Version 10.00.40219.01
Copyright (C) Microsoft Corporation.  All rights reserved.


Dump of file gdi32.dll

File Type: DLL

  Section contains the following exports for GDI32.dll

    00000000 characteristics
    573C8294 time date stamp Wed May 18 16:56:20 2016
        0.00 version
        1000 ordinal base
         727 number of functions
         715 number of names

    ordinal hint RVA      name

       1012    0 00043F40 AbortDoc = _AbortDoc@4
       1013    1 00045806 AbortPath = _AbortPath@4
       1014    2 0003BA5C AddFontMemResourceEx = _AddFontMemResourceEx@16
[...]
Out of the blue my hosting provider finally offers one SSL certificate for free to use with my site. I’ve been using StartSSL certificates for my home servers for a long time now, but on the shared hosting servers I couldn’t just install my certificates and I felt the prices for regular ones are a pure rip-off.
In any case, kilgus.net finally got HTTPS support and I have adapted the site accordingly. I had to change all download links for this to work, so if I have missed a broken link or in case of any other problems, give me a shout.
Sometimes things happen out of the blue. I haven’t heard from my fellow QL friend Peta Jaeger for years and yesterday he mailed me a complete ready-to-run distribution of QPC2 for MacOS X. Under the hood it employs the WINE Windows emulation layer, so QPC2 is of course still not a native Mac application, but it almost feels like one. I only have a headless Mac at home (meaning without a monitor or keyboard) and I’m currently 5km away from that, but even through the remote VNC connection it felt absolutely usable, which I find pretty amazing. Peta also included the Black Phoenix QL software distribution so you can start clicking through various applications right away. It is installed like pretty much any other Mac application, but if you have questions feel free to contact Peta about it.
Interested? Check it out on the Downloads page.

QPC2 running on Mac OS X
This is my first post about my new hobby, smart homes in general and specifically HomeMatic, and it’s already quite a technical one: solving the AES authentication problem with the new HM-SEC-SD-2 smoke detectors. The detectors use cryptographic authentication between them so that not every grumpy neighbour can activate the alarm. This is good, but also a problem when you want to activate the alarm yourself, as part of a burglary system for example.
The main tip came from Michael Gernoth, who mentioned that the CCU2 software used to contain a function called performCBCAuthentification, which sounded like it could fit the given scenario. Fortunately reverse engineering is something I’m usually pretty good at, so I set out to have a look. Reverse engineering binary code is somewhat akin to assembling ground coffee back into beans. Challenging but also satisfying when it works. The tool of choice is a somewhat expensive tool called IDA which my employer fortunately bought for me to do my job. Unfortunately not the very expensive version that can actually output C-like code, just the disassembler one, but we can work with that 😉
On the high level overview the function in question looks like this:

Which is actually not too bad. Somewhat regular and not too much code overall. Zooming into one part looks like this:
This may look wild to the untrained eye but is actually great news: one one hand, it’s ARM assembler, which I have never read before and also, it’s C++, which is a pain to read in assembler, but on the other hand we see that IDA found many symbols and that most function calls actually have names. This is like winning the lottery! One function call in particular shows what it means to have C++ code at hand:
BL _ZNSt8_Rb_treeIiSt4pairIKiSsESt10_Select1stIS2_ESt4lessIiESaIS2_EE17_M_insert_unique_ESt23_Rb_tree_const_iteratorIS2_ERKS2_ ; std::_Rb_tree<int,std::pair<int const,std::string>,std::_Select1st<std::pair<int const,std::string>>,std::less<int>,std::allocator<std::pair<int const,std::string>>>::_M_insert_unique_(std::_Rb_tree_const_iterator<std::pair<int const,std::string>>,std::pair<int const,std::string> const&)
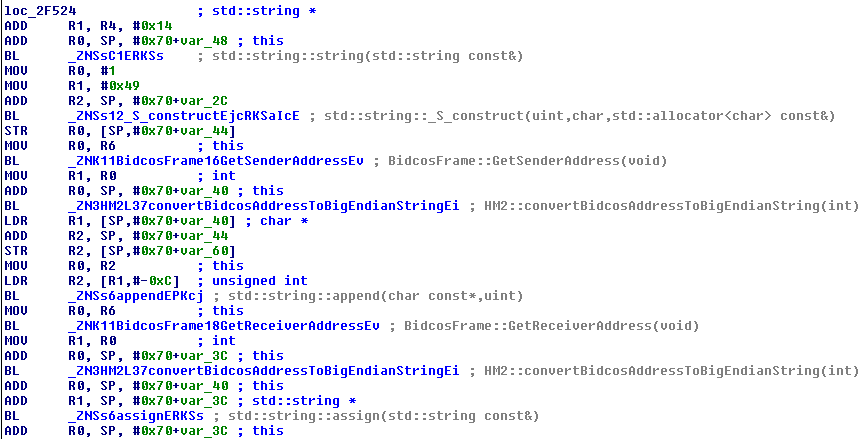
Everything clear now? Thought so. Unfortunately our newly found fortune doesn’t cover variables and object properties, so parts like the following look a lot easier visually but without any clue what the data is, is a lot harder to analyze:
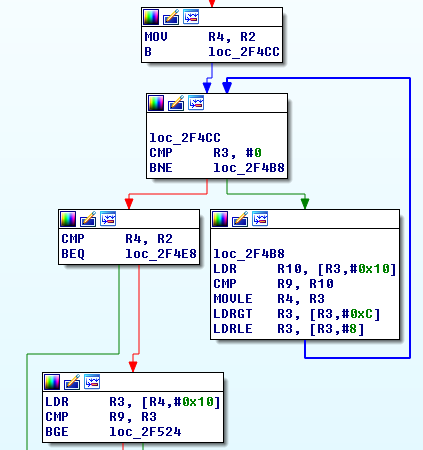
It looks like it’s traversing a doubly linked list in search of the encryption key, but I haven’t analyzed this part of the code 100% and probably don’t need to.
In the first step I tediously transcribed the code I’ve seen back into something somewhat resembling source code. By hand…
DWORD __cdecl StructuredFrame::GetIntValue(int offset, int, int size, int *result)

{

    [...]

}
// BidCosFrame inherits from StructuredFrame
int BidcosFrame::GetSenderAddress(void)
{
int result;
if (!StructuredFrame::GetIntValue(3, 0, 3, &result)) return -1;
return result;
}
int BidcosFrame::GetReceiverAddress(void)
{
int result;
if (!StructuredFrame::GetIntValue(6, 0, 3, &result)) return -1;
return result;
}
// HM2 probably inherits from std::string
DWORD __fastcall HM2::convertBidcosAddressToBigEndianString(int x)
{
byte tmp[4];
tmp[2] = x >>; 16;
tmp[1] = x >>; 8;
tmp[0] = x;
this.append(tmp, 3);
}
DWORD __fastcall RFChannel::performCBCAuthentification(BidcosFrame *Frame)
{
int tmp;
frameSize = Frame.GetSize();
if (frameSize <= 14) return 0;
Frame.GetIntValue(frameSize - 6, 0, 1, 0, &tmp);
iv = (byte)tmp;
Frame.GetIntValue(frameSize - 5, 0, 1, 0, &tmp);
iv = iv << 8 + (byte)tmp;
Frame.GetIntValue(0, 0, 1, 0, &tmp);
iv = iv << 8 + (byte)tmp;
if (iv <= this->AesCbcCounter) return 0;
// Get Key from RFManager... somehow
keyStr = new std::string(...key...);
ivStr = new std::string(1, '\49', std::allocator);
ivStr.append(convertBidCosAddressToBigEndianString(Frame.GetSenderAddress()));
ivStr.append(convertBidCosAddressToBigEndianString(Frame.GetReceiverAddress()));
ivStr.append(convertBidCosAddressToBigEndianString(iv);
ivStr.append(5, '\0');
ivStr.append(1, '\5');
AES_init_key(keyStr);
byte *block1 = new byte[16];
AES_encrypt_block(ivStr, block1);
str2 = new std::string();
str2.append(Frame.GetByteData(0), 1); // Count
str2.append(Frame.GetByteData(1), 1); // Flags
size = Frame.GetSize() - 15;
if (size < 0) return 0;
if (size >= 14) size = 14;
if (size != 0) {
str2.append(GetDataByte(9), 1); // Channel
r5 = size + 9; // FrameSize - 6
r4 = 10;
if (r5 != r4) {
if ((size - 1) & 1 != 0) {
str2.append(GetDataByte(r4++), 1);
}
while (r4 != r5) {
str2.append(GetDataByte(r4++), 1);
str2.append(GetDataByte(r4++), 1);
}
}
if (size != 14) {
str2.append(size - 14, '\0');
}
}
block1[0] ^= str2[0];
block1[1] ^= str2[1];
block1[2] ^= str2[2];
block1[3] ^= str2[3];
block1[4] ^= str2[4];
block1[5] ^= str2[5];
block1[6] ^= str2[6];
block1[7] ^= str2[7];
block1[8] ^= str2[8];
block1[9] ^= str2[9];
block1[10] ^= str2[10];
block1[11] ^= str2[11];
block1[12] ^= str2[12];
block1[13] ^= str2[13];
block1[14] ^= str2[14];
block1[15] ^= str2[15];
AES_init_key(keyString);
byte *block2 = new byte[16];
AES_encrypt_block(block1, block2);
int a = Frame.GetDataByte(frameSize - 4) ... Frame.GetDataByte(frameSize - 1);
int b = block2[12] ... block2[15];
return a == b? a: 0;
}This is not supposed to compile and there might be transcription errors or bugs in it. It’s just to get your notes in order and is certainly a lot more readable than the code we’ve started with, so we can finally deduct the algorithm from it!
Given the example frame of:
00 01 02 030405 060708 09 0A 0B 0C 0D 0E 0F101112
01 14 41 44E347 44E347 01 01 96 00 00 03 0A802A78
 | Flg | Sender Recvr   |  |  |    IV1 |
Cnt  Type             Chn No State    IV2
In our example frame this adds up to “4944e34744e347000301000000000005”.
This gives us “01140101960000000000000000000000”.
The CCU2 code only contains the routine to check a signature, not to generate one. So at this stage it’s unknown to me why the two IV bytes have the value they have, as I don’t own the hardware yet nor was I given any more example frames to work with. Maybe they can be chosen freely, maybe they are counted up. In any case, the remaining work should be fairly easy to do in comparison. Hope I could help!
A little over two years ago QPC2 v4 was made available for free to celebrate the birth of my little girl Marla. I wanted to release 4.03 for her first birthday but missed the date and then forgot about it (the changes weren’t that important anyway). So I planned to release what I have for her second birthday and missed that, too… then I noticed the 18th birthday of my web presence came up last week, so I was going to release it then for sure! Spoiler-alert: I didn’t make it. But this time for a good reason at least: Wolfgang wanted to include a few last-minute changes to SMSQ/E that would allow it to draw alpha blended blocks. I liked the idea in general, but just supporting blocks seemed a bit halve-baked to me, so I foolishly offered to extend the alpha blending support to the whole graphics sub-system!
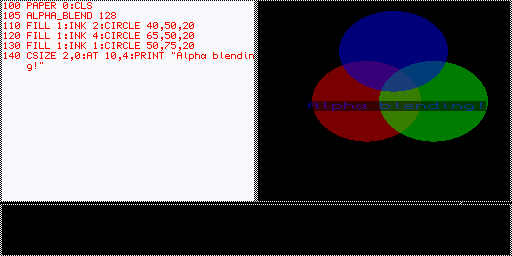
Okay, this is a job that is, in principle, actually not that difficult, but in practice and when you want to achieve at least some level of performance it can be a bit of a pain to develop. Especially if you’re crazy enough to also aim for supporting the old-timey stipples, and I’m no man for halve-finished jobs, so stipples there will be! So, after the girls go to bed I usually have one or two hours to myself and I made some good use of them. Today I can finally show you the result:
The alpha blending support is, like INK, PAPER or OVER, a part of the settings of a window. The setting can be changed using the aptly named ALPHA_BLEND SBASIC command. It takes two parameters, a channel and an alpha weight from 0 to 255 with 0 being transparent and 255 being opaque. So, after executing for example ALPHA_BLEND #1,128 all future graphics commands on channel 1 including BLOCK, CIRCLE, LINE and PRINT will draw their contents halve-transparent over the existing background until alpha blending is disabled again (by setting the weight to the default of 255: ALPHA_BLEND #1,255). Here’s a little example:
The trap to control the mode from other languages is defined as thus:
|                                                                             |
|  Trap #3    D0=$62                                               IOW.SALP   |
|                                                                             |
|       Set the alpha blending weight for a window                            |
|                                                                             |
|  Call parameters                      Return parameters                     |
|                                                                             |
|  D1.B alpha weight (0..255)           D1   preserved                        |
|  D2                                   D2   preserved                        |
|  D3.W timeout                         D3   preserved                        |
|                                       D4+  all preserved                    |
|                                                                             |
|  A0   channel ID                      A0   preserved                        |
|  A1                                   A1   preserved                        |
|  A2                                   A2   preserved                        |
|  A3                                   A3   preserved                        |
|                                       A4+  all preserved                    |
|                                                                             |
|  Error returns:                                                             |
|        ICHN  channel not open                                               |
I don’t actually have any use for this feature myself, I just wrote it because, well, I could. I certainly hope somebody else finds it useful, though 🙂 And after all these years of developing SMSQ/E this is actually the first trap that I have defined myself (all other functions I introduced were vectored routines)!
I’ve written many hundred thousand lines of assembler in my life and 20 years ago when hacking on an 8Mhz 68008 or even a 66 Mhz 486 this still made a lot of sense. But the times have changed a lot, not only are CPUs so fast that speed doesn’t really matter that much anymore, compiler became so good that you will have some real trouble beating them with your average assembler code! Also, CPUs have been optimized to execute compiled code and if you do some clever trick in assembler that a compiler wouldn’t do you could actually end up with much slower code on a new CPU generation (this has happened with QPC before).
To cut a long story short, every time I had to touch a sub-system of QPC in the last few years I rewrote it in C first in order to not go insane for writing any more lines of x86 assembler. This time it was the DOS device that got the C treatment. Functionality wise not much has changed, except one thing:
RENAME SUPPORT!
It always bothered me that the DOS device could not rename files and if I had known 15 years ago what I know today I could have implemented it back then, too, but alas I didn’t. The feature as it is now implemented needs Windows Vista+ to work, so XP and lower still cannot rename files (boo hooo!). But if you’re still using XP I strongly urge you to update anyway.
The rest is mostly minor bug-fixes, you can check out the details in the version history. Perhaps one interesting change is Respect “Keep aspect ratio” when going into fullscreen mode. The story behind this is that QPC2 v4 does not alter the physical screen resolution to go full screen anymore, it just stretches the content of the QL screen to the extent of the monitor. This is a bit of a problem when the screen resolution is for example 1366×768, because in order to stay compatible to the QL colour mode QPC enforces the screen x-resolution to be divisible by 8, and 1366 is not. So QPC will round down and try to stretch a 1362×768 QL screen to a 1366×768 monitor, which can only be done by doubling a few pixel columns. If you are in this situation then enabling the “Keep aspect ratio” option will now make sure that the screen will not be stretched, instead there will be four black columns on the right hand side of the screen instead, as it was with QPC2 v3.
So this is it, the first new release in two years. I hope you’ll like it, enjoy!
… to this very website. According to a copy I obtained from Archive.org my website had its 18th birthday yesterday (back then it was under a different URL which I won’t disclose here because of embarrassment and stuff). I wanted to celebrate this by releasing a new version of QPC, but unfortunately one last minute SMSQ/E feature wasn’t finished in time.
Still, 18 years is a frighteningly long time and reaches back into some pretty early stages of the web. It was quite common to have a “visitor counter” and I actually had one until the last redesign. The last value it displayed was 153200, but I’m not even sure it worked properly the last few years. In the heyday of QPC there was quite a lot of traffic because of it. Later most people found the site because they were searching for some Wifi hardware that I analyzed in the “hacking” section I used to have. Nowadays it’s mostly QPCPrint that is still interesting. And occasionally people apparently search for my name, for whatever reason. My name used to be globally unique for a long time but thanks to Facebook I’m now aware of at least one more person sharing it, so perhaps they want to find him instead 😉
Anyway, that’s it for now. Next time, new QPC. Probably.
In 1991 Albin Hessler released the EasyPtr package to the world. It was quite revolutionary for its time, combining a powerful SuperBasic extension with a true WYSIWYG dialog editor. I was a young lad back then, about 12 years of age, and luck would have it that Albin was friends with Jochen Hassler, who happened to be working with my dad. If it wasn’t for Jochen I probably would never have owned or used a QL, by the way, but I digress. Due to my connection I was one of the first people getting their hands on EasyPtr and I actually still remember the excitement I felt when reading through the manual for the first time. Yeah, I was probably never what you would consider a “normal” child.
I reported back a few bugs I found through Jochen and after a few days I got a package in the mail with a copy of a QL game called “Brain Smashers” as a thank you. I was overfilled with joy and it actually still pains me a bit that I have never really thanked him for it because, believe it or not (and most people knowing me today will probably opt for “not”) I was just too shy back then! But I actually still have it after all these years, including the ring binder manual.
Albin was also head of the local QL chapter, often the meetings were held in his home, and in time I considered him a friend. Along with Jochen we traveled to a lot of QL shows in a road-trip kind of way all over Europe for years to come, which was really a lot of fun. And when Albin and Jochen left the QL scene I continued this tradition with Jochen Merz for even more years, including many trips to the USA that I remember quite fondly.
After I had written what is now called WMAN2, the window manager that could handle the new high colour drivers, voices grew louder for an update to EasyPtr to support the colours, too. So, after much prodding by some very persuasive people, mainly Per Witte I guess, I finally gave in and updated EasyPtr around 2004. This was a huge task because while later products from Albin Hessler like CueShell were very well written, EasyMenu’s code was, let’s say, a bit harder to read and maintain. Due to the amount of work this update was released commercially. It sold very well at the official release meeting in England, but after that I never saw another cent coming from the island… I can only speculate if no more copies were sold or if the license fees just never reached me. So apart from the handful copies sold through Jochen Merz this was not a successful venture, but as the package was also such a huge part of my childhood I still don’t regret doing it.
Finally last month I got an inquiry about how to obtain a copy which triggered me to do the next logical step in EasyPtr’s live: releasing it for free. So here you have it, in all its glory:
Files: EasyPtr4.zip
Manual: EasyPtr4.pdf
A bit late perhaps, but better late than never, right? So enjoy, tell me if you like it or hit the tip jar if you want, it’s completely up to you. Have fun with it!
I promised last time that I will only write a new post if I have something interesting to say. Today’s topic is interesting to maybe three people in the world, but I’m sure they will be thrilled. Today I was asked a question about the SMSQ/E boot sequence and it’s been so long that even I had to research again how it works, so I might as well write it up now. In the following text I’ll try to explain the early boot sequence of both QPC and Q40.
Attention: The whole text is based on me looking at the sources for roughly two hours. I took care to be accurate, but I’ve been wrong before in my life. Twice or so.
An SMSQ/E file or ROM consists of separate modules, one concatenated after the other (hardware initialisation, screen driver, disc driver, etc.). Every module has a header except the first one, the host module. As most SMSQ/E files can be executed directly from another host OS, the host module must start with code. It has a trailer instead, which is at the end of the whole SMSQ/E file (so one could say the host module includes all other modules).
On the Q40, the ROM is seen in two places: $00000000-$00018000 (only first 96kb) and $FE000000. The lower region has one special feature: when the ROM is visible, all write accesses go to a shadow RAM area (default mode). The hardware can switch the mode (by writing to address $FF018000) so that a read will be from the shadow RAM and any write will be ignored. The ROM is hidden in this case. The mode can be switched back by writing to address $FF010000.
The CPU will get its initial instruction pointer from address $00000004, i.e. in the lower ROM area. In case of SMSQ/E this will point to $FE000062, so execution continues in the upper ROM copy. The lower copy of the ROM is not used again after that.
On QPC the SMSQE.BIN file is simply loaded to $00030000 and the virtual CPU starts executing instructions from there.
Q40: sys_boot_q40_rom_asm
QPC: smsq_qpc_host_asm
File: smsq_smsq_loader_asm
Q40: smsq_q40_hwinit_asm
QPC: smsq_qpc_hwinit_asm
File: smsq_smsq_base_asm
The whole boot scheme is pretty clever but also hard to understand at first glance. But it does the job of catering for many different platforms and usage scenarios (boot from ROM, loaded from other host OS etc.) very well. For me it was enjoyable to once again dig a bit deeper into the OS I once have loved and known so well and I hope at least 3 other will join me in my delight 😉
Updated with input from Peter Graf.